iCORE Hours App - English User Guide (iOS)
Welcome as a user of the iCORE Hours app!
Introduction
iCORE Hours is a time recording app for mobile phones and tablets. If you are going to use the app, it is required that your business is using iCORE time capturing software. The app features functionality for time recording and electronic signing of timesheets. When timesheets haven’t been completed or signed, or when timesheets are rejected, app users can receive push-messages from the central iCORE installation.
In addition, the iCORE Hours app can record hours based on timestamps, handle absence, display current man hours statuses, time balances and internal news from your business. Available functionality depends on the app-version installed on your mobile unit and the software version running on your company's central iCORE installation.
Support
If you need help using the iCORE Hours app, contact the iCORE administrator in your business.
Navigation within the app
Navigation within the iCORE Hours app is performed by clicking the icons in the menu positioned at the bottom of the screen. Your active menu choice is colored blue.

In some screens you will experience that the bottom menu is hidden to provide better space for displaying information. In such cases, you can navigate back to the previous screen by using the back or cancel functions, found in the upper left corner of your screen.
![]()
Language
The iCORE Hours app supports Norwegian and English languages. On installation of the app, default language is set according to the language setting on your mobile unit. For users with Norwegian, Swedish, Danish and Icelandic language settings, Norwegian is selected. For all other languages, English is selected.
You can select your preferred language by clicking "Profile" in the menu and then select "Settings" in the upper right corner of the screen. Click the "Language" row to select language.
Timesheets Overview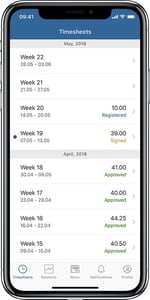
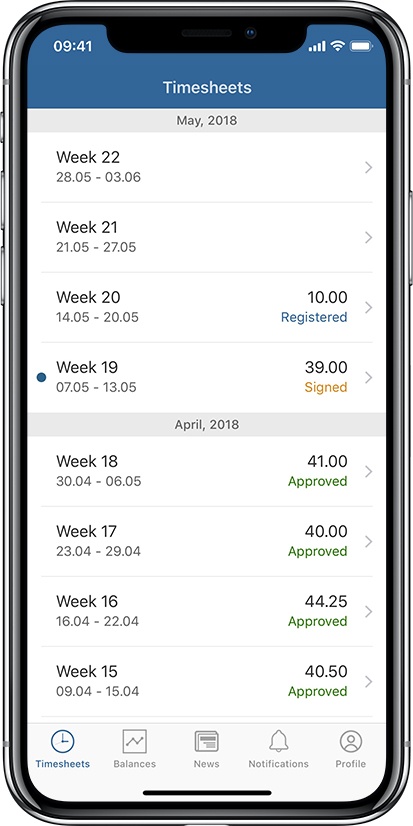
The Timesheets Overview screen is the app’s startup screen, with your weekly timesheets organized per month. You can scroll up and down by swiping;
- Up to scroll down
- Down to scroll up
On the left-hand side of the screen you will find week numbers and their date ranges. The current week is marked with a blue dot.
On the left-hand side of the screen you will find the total number of hours recorded and the timesheet status. Timesheet statuses are color-coded as follows:
- Pre generated (system generated)
- Rejected
- Registered
- Signed
- Approved
To register, change or view timesheets, click the rows.
Timesheet Week-screen - Accumulated View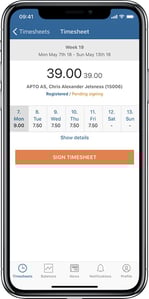
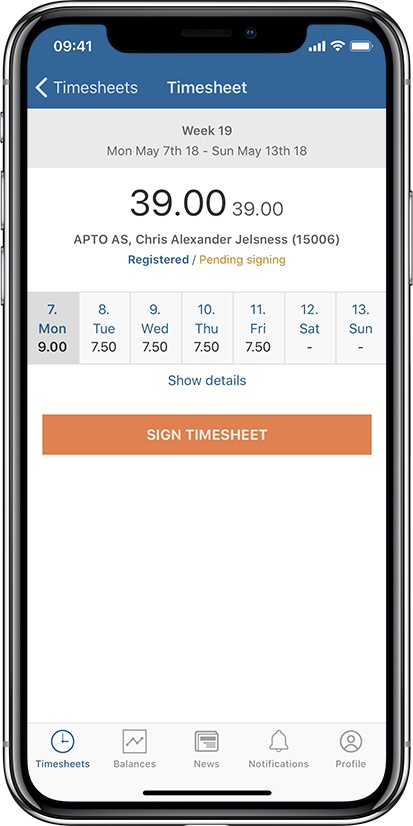
When you have selected a timesheet from the overview-screen, the timesheet week-screen opens. The default view mode is accumulated.
The first section at the top of the screen displays the week number and the date range that is covered. The second section, the header section, displays the total number of hours recorded for the week, followed by the number of “normal time” hours recorded for the week. What hours are included in normal time depends on the selected configuration of your business’ iCORE installation, but normally overtime, extra time, etc. is excluded.
User/personnel information is displayed below the number of hours, along with company name (some users have user profiles connected to more than one company), name, personnel id and the timesheet main and sub statuses.
Below the header section, hours are summarized per day that is within the range of the week. If You want to navigate to one of the days, click one of the day cells. You can read more about this in chapter “Timesheet – Day-screen”.
The sums per day are followed by a link, “Show details”, that enables you to expand the screen to detailed view mode. You can read more about this in chapter “Timesheet Week-screen – Detailed View”.
Finally, at the bottom of the screen, you find the “Sign timesheet”-button. When you click the button, a list of personnel that are authorized to approve your timesheet is presented. Swipe up or down to select a person and complete the signing process by clicking “Select”.
Timesheet Week-screen - Detailed View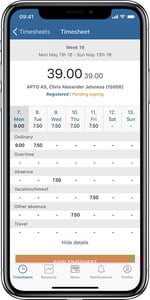
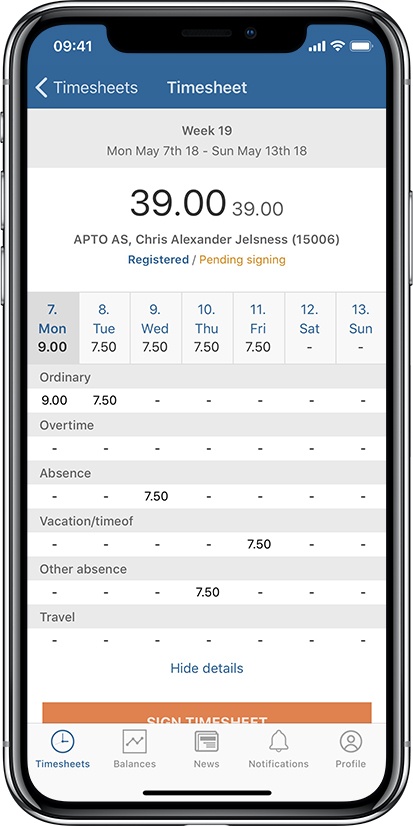
When you have clicked “Show details” in the timesheet week-screen, the screen is expanded to display sum of hours per hours type group, per day.
How hours types are grouped into hours type groups depends on the selected configuration of your business’ iCORE installation. If you can’t see all hours type groups in your screen, swipe up or down.
To return to accumulated view mode, click the link “Hide details” below the expanded section of the screen.
Timesheet Day-screen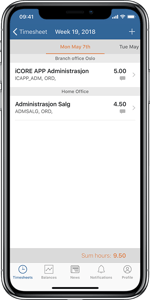
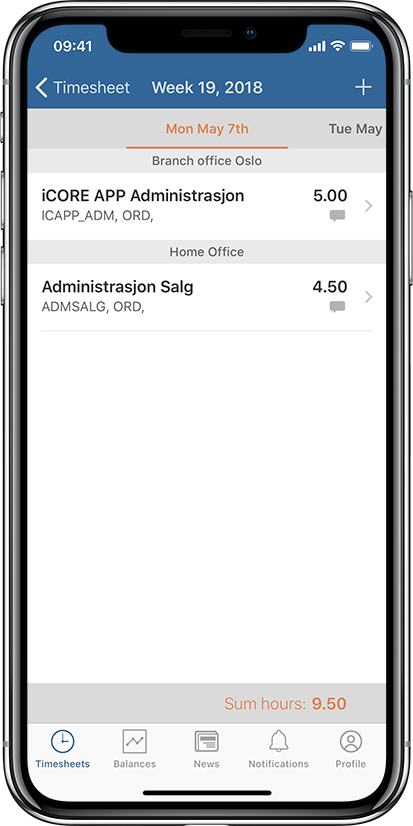
The timesheet day-screen is accessed by clicking one of the days in the week-screen.
At the top of the day-screen a ribbon displays the days that are within the range of the week. You can navigate between the days by swiping left or right. The selected day is marked with orange text.
Registered hours and wage allowances are grouped per work location and cost unit, hours type and other dimensions that have been selected in your business’ iCORE-installation. If a comment has been attached to a registered occurrence, this is indicated by an icon below the number of hours.
At the bottom of the screen the number of hours recorded for the day are summarized. Wage allowances are not included in the sum.
To create a new occurrence, click the plus-sign at the top right corner of the screen. You can read more about this in the chapter “Timesheet Registration and Changes”.
To delte an occurence, swipe left and push the Delete-button that appears on the right side of the occurence.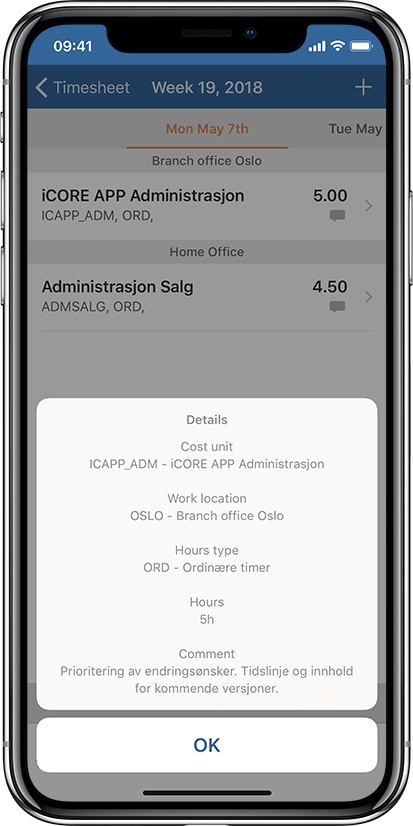
When a timesheet hasn’t been approved yet, you can click the rows to view or change registered information. In such cases, the rows are marked with a navigation indicator (>) at the right-hand side of the number of hours.
If a timesheet has been approved, you can click the rows to view information, but no changes can be made. Instead, information is presented in a pop-up window, displaying the information you have entered along with associated descriptions.
If you want to view information in the pop-up window when a timesheet hasn’t been approved, click and hold the rows until the pop up window opens.
Timesheet Registration and Changes
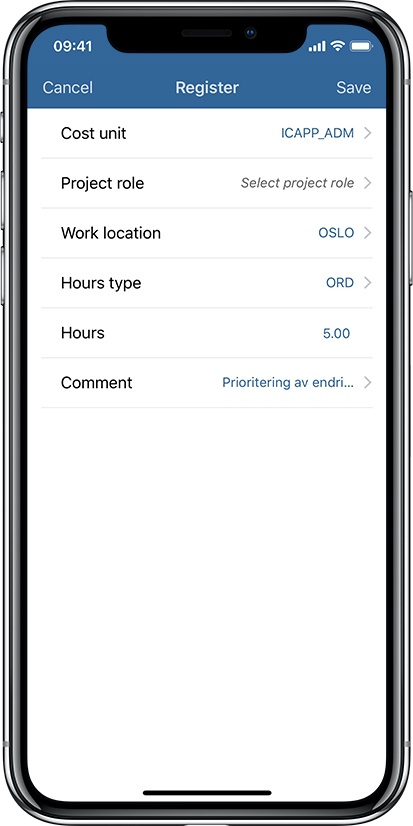
When you have entered a timesheet that hasn’t been approved an click the plus-sign in the upper left corner of the screen, or when you click on an existing row, the registration screen opens.
Which information elements are available in the registration screen depends on the selected configuration of your business’ iCORE installation.
If you are registering a new occurrence, and you have chosen standard values for some of the information elements, those values will be pre-selected. You can read more about this in the chapter “Profile”.
To enter new information or change one of the information elements on an existing occurrence, click the row that you want to change. A new screen will open, and you can search and select among available values. For numeric (like hours) an text fields (like comment), enter values using the pop-up keyboard. When you have finished, click “Save” in the upper right corner of the screen. You will return to the timesheet day-screen after the occurrence has been saved.
If you want to undo your changes, click “Undo” in the upper left corner of the screen. You will be required to confirm that you want to undo your changes.
If your business’ iCORE installation has been configured for time of day registration, a separate field will be displayed in the registration form. When you click the field, a pop-up opens with a list of intervals for that day. If you want to add a new interval click on “+”. You will then see a round clock where you can pick a start-up time and an end-time. The total hours will be calculated automatically. To use the calculated number of hours, click on “Use calculated hours”.
To delete an interval, swipe left on the row and click “Delete”.
Timestamps
Timestamps/timers are used for automatic tracking and calculation of time spent on different tasks (Cost Units).
There are two ways to start new timers:
- Timers that create new intervals for tasks that you have worked on previously.
- Timers for new tasks that you haven't worked on previously.
To start a new timer for a task that you have been working on previously, press one of the Play buttons at the end of the rows in the upper part of your screen. To start a new timer for a task that you haven't been working on previously, press the Play button at the bottom of your screen.
The status for your active timer is displayed at the bottom of your screen. If you press the timers text-field, you are directed to a screen where key information can be added or changed, like Cost Unit, Hours Type, etc.
Timers are stopped and saved to your timesheets by pressing the Stop button. Stopped tasks are displayed in the list of registered hours, and you can press their text-fields to add additional information, for instance comments.
If you don't want to keep an occurrence that has been tracked by a timer, you can delete it by swiping to the left and press "Delete".
When a timer is stopped, and all key information has been entered, the tracked interval is written to the central server. If any information is missing, a waring message is displayed, before you are forwarded to a screen where the missing information can be entered. If entering of key information is omitted, or you don't have internet access, the tracked interval is stored locally and marked with a warning icon.
Locally stored intervals are not displayed in timesheets, and they exist only on the mobile unit. When information is completed and/or internet access is available, they are synchronized with the central server and visible on the timesheets that they belong to.
Absence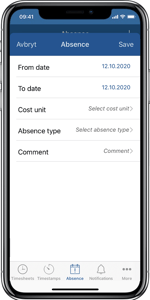
To register your own absence, navigate to the menu and click the option «Absence». Here you will find an overview with all your registered absence of the types used for self-certification in your company. The absence is displayed in descending order. Every row has information about cost unit and type of absence, followed by the date interval and optionally a comment. To change an absence, simply click it. To delete an absence, swipe left on the desired row to delete. Then click the “Delete” option in the menu that pops up.
To register a new absence, click on the plus-icon in the top right corner of the screen. It will take you to a registration screen, where the date of today is pre-assigned. Change to desired dates, fill inn correct cost unit and type of absence. Two of the most common types of absences include “Sick – Self Certification” and “Sick child – Self Certification”. Optionally type a reason for the absence in the comment field and click “Save”.
Balances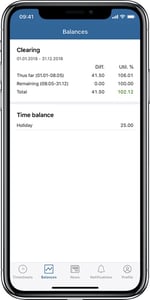
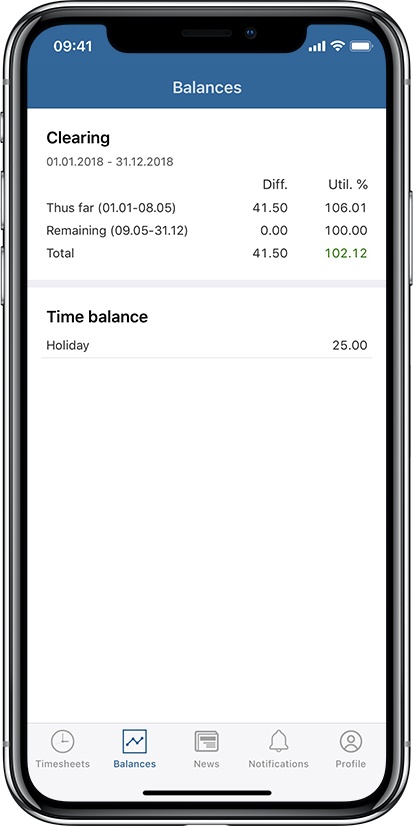
You open the Balances screen by clicking the Balances icon in the menu. The Balances screen displays current man hour clearing and time balance statuses. What information is actually shown, depends on the selected configuration of your business’ iCORE installation and Your user access.
The Balances screen is divided into two sections. The first section displays your man hour clearing status, with utilization and time difference measured against available time, for the elapsed period of the clearing-year (Thus far), planned work for the rest of the clearing-year (Remaining) and as a prognosis for the entire clearing-year (Total).
If your business uses time balances, you will find current status for each relevant balance in the second section of the screen. In the sample screen there is only one time balance, for Holidays.
News
The menu choice News opens a screen that displays active news and messages from your business’ iCORE installation. Click a news case to read its contents.
Notifications
If you have forgotten to register your hours, forgotten to sign your timesheet or your timesheet has been rejected on approval, the iCORE Hours App will give you a notification. You will notice that you have received a notification by the red symbol that appears on the iCORE Hours App icon and on the Notifications menu-icon.

The Notifications screen opens when you click the Notifications menu-icon. Click any active notification to be forwarded to the timesheet in question, and perform necessary actions.

Profile
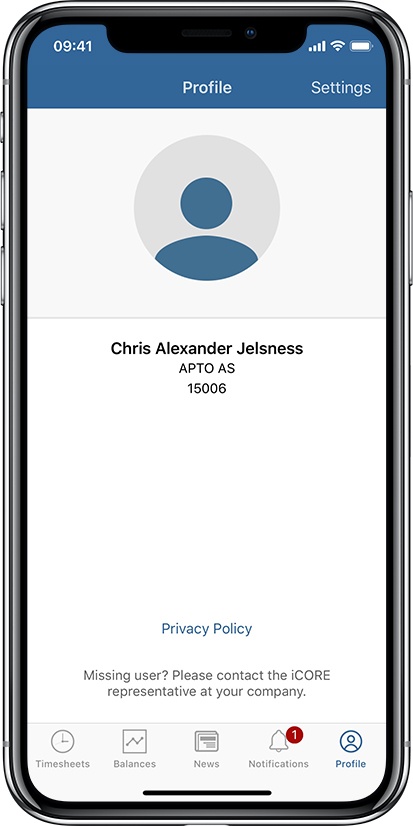
The profile screen allows you to change user profile, if you have access to more than one iCORE installation.
From the Profile-screen you can access the Settings-screen, where timesheet defaults are maintained. Which defaults are available depends on the selected configuration of your business’ iCORE installation.

The iCORE team hopes you will have a nice experience with the iCORE Hours App!